TIS_Market_Structure for TradingView
This indicator is available by subscription only. Subscribe on our TradingView page →Este indicador está disponible solo por suscripción. Suscribite desde nuestra página de TradingView →
Indicador de estructura de mercado en Pine Script que etiqueta cada quiebre como BOS o CHoCH sobre el pivote que cedió, sombrea las mitades premium y discount del rango actual y traza la zona de entrada óptima. Filtros de permiso para largos y cortos, con alertas y compatible con TIS_Automator.
Pine Script market structure indicator that labels every break as BOS or CHoCH on the pivot that gave way, then shades the premium and discount halves of the current range and draws the optimal entry zone. Long and short permission filters, alert-ready and compatible with TIS_Automator.
Descripción
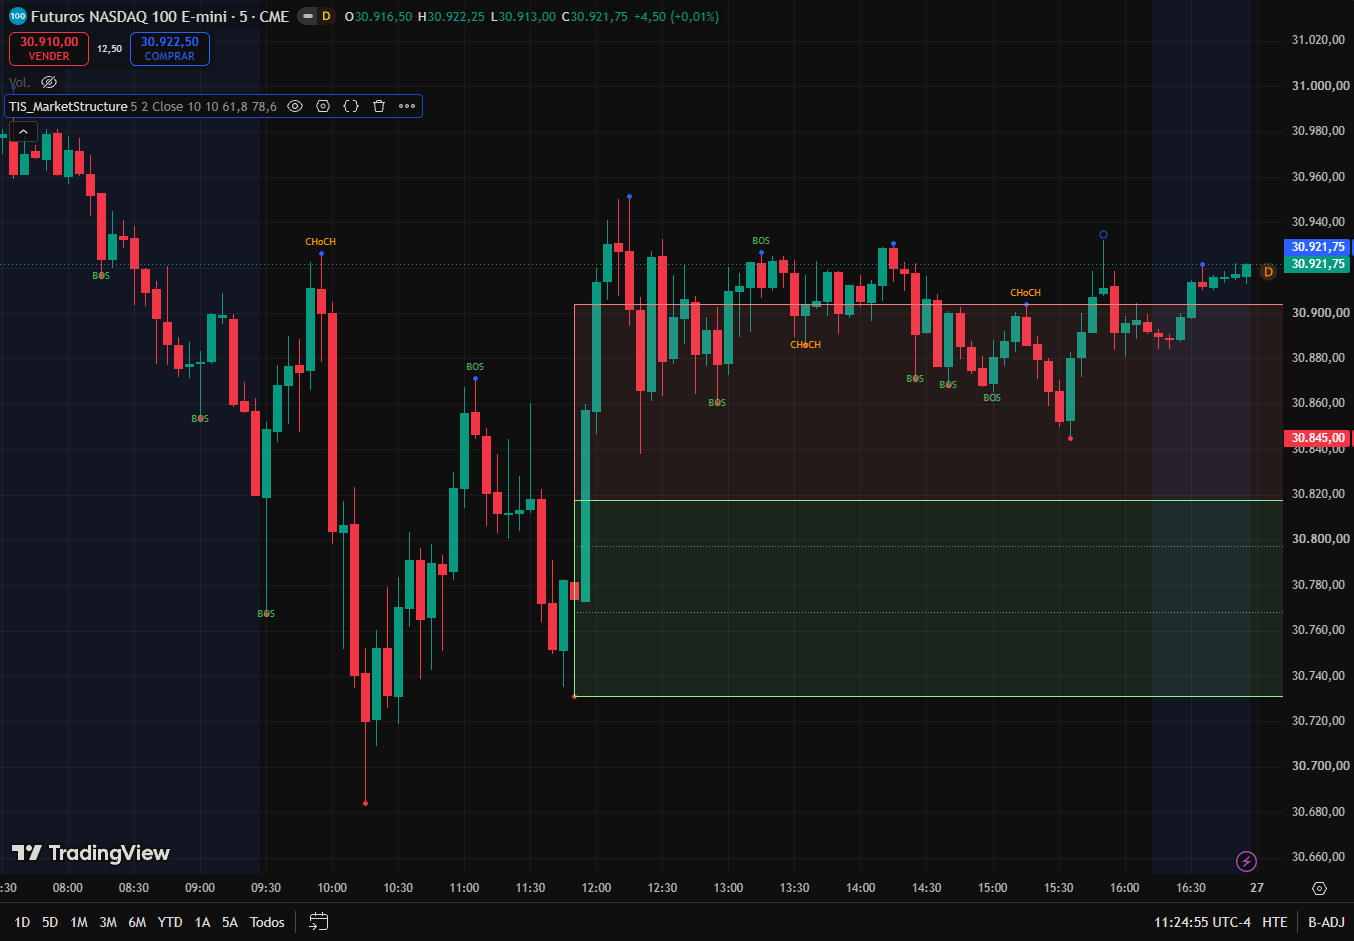
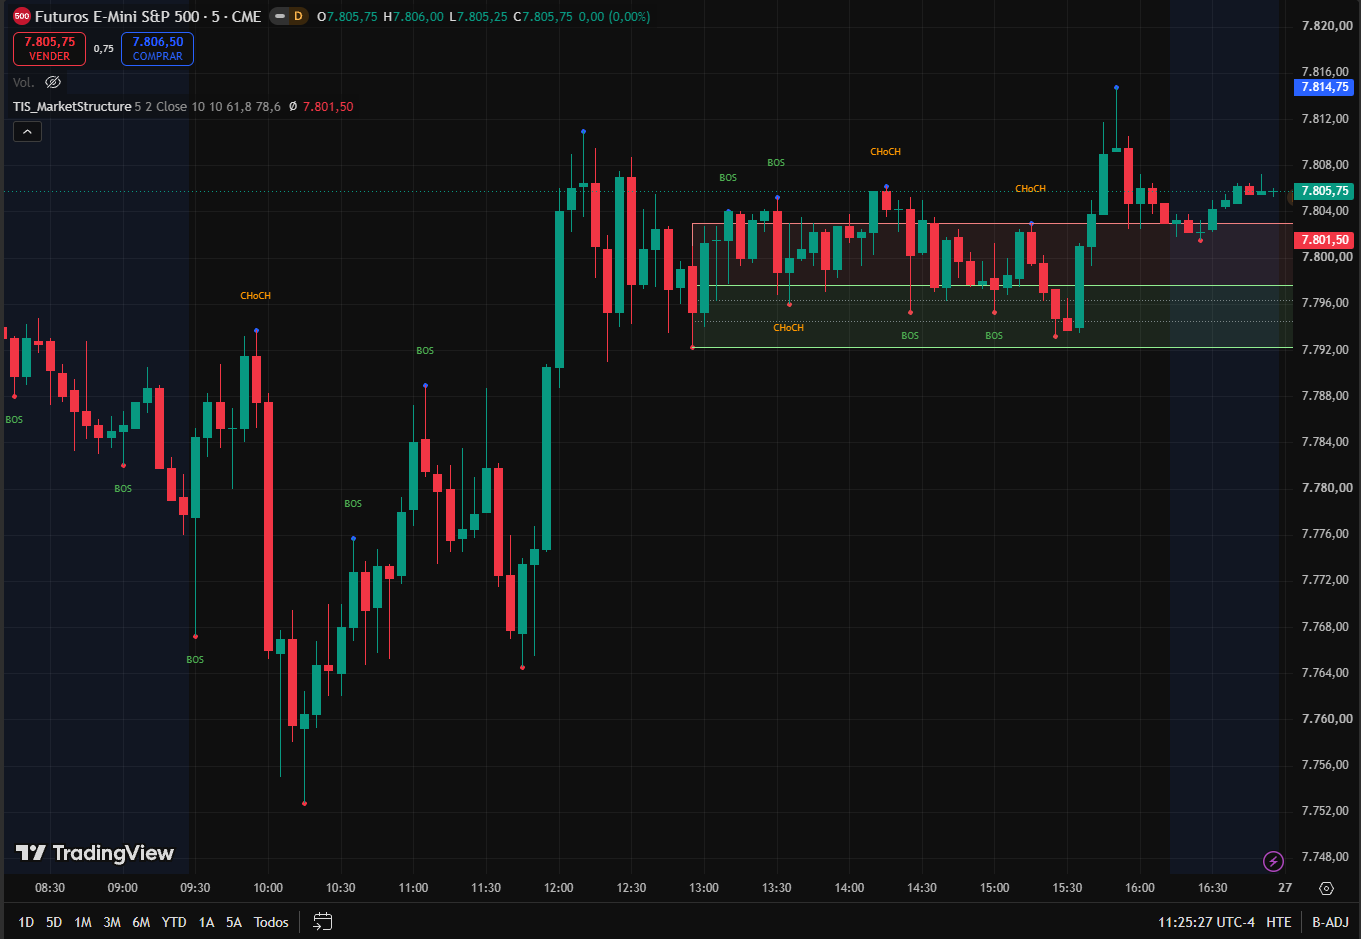
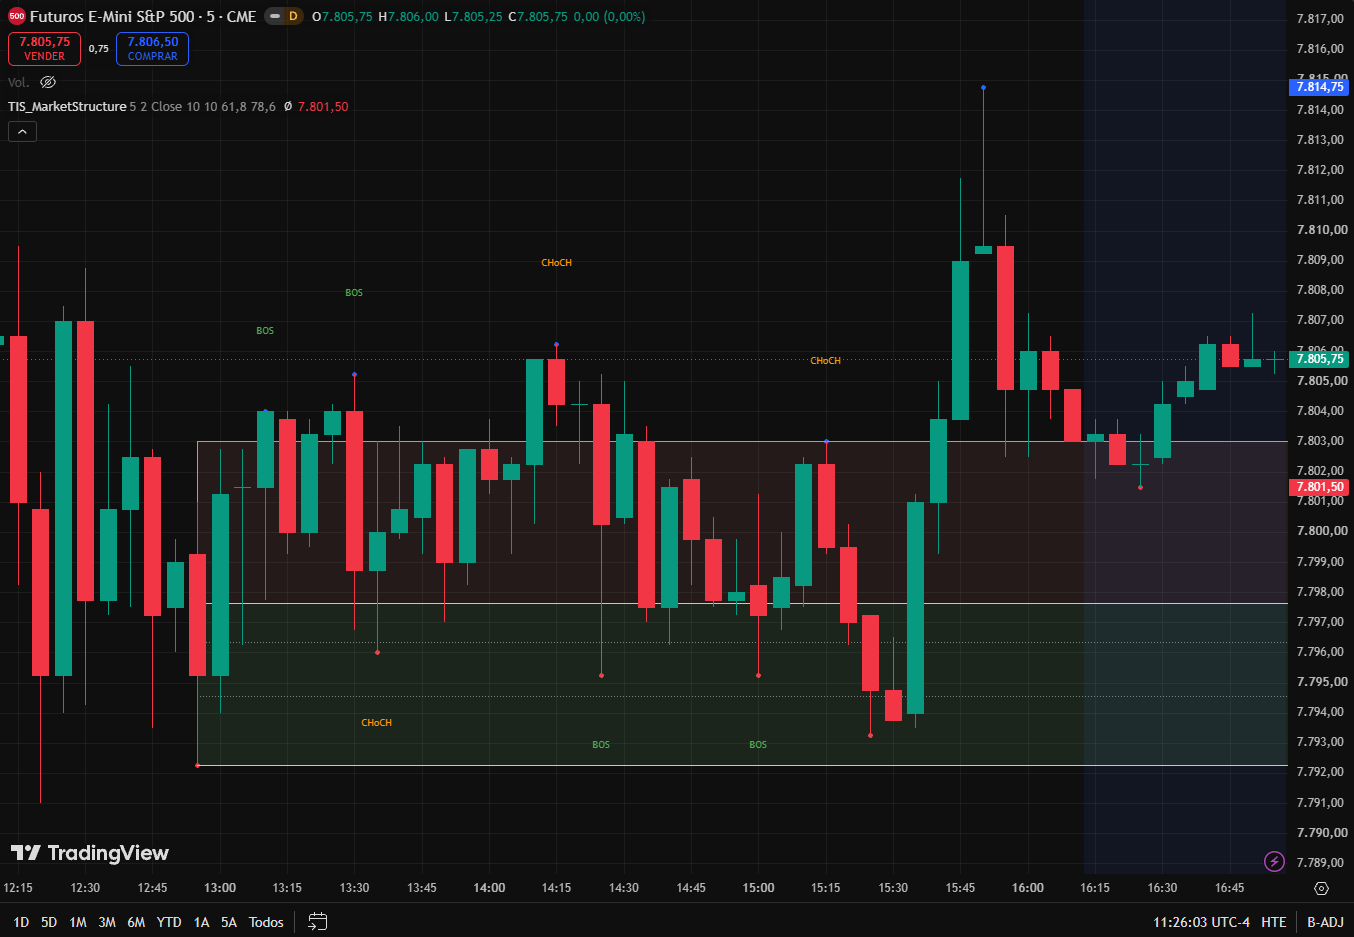
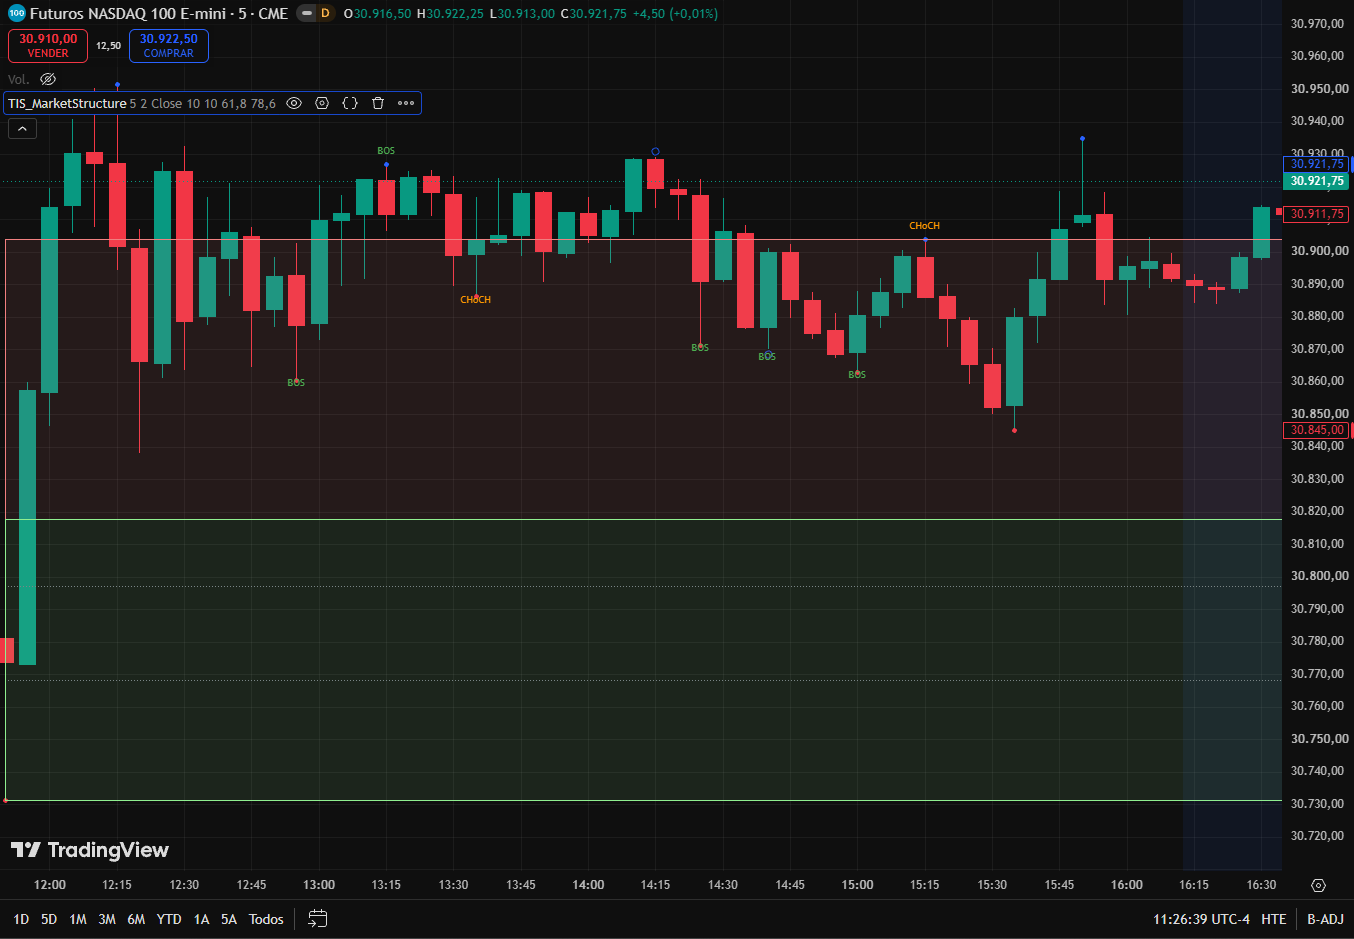
TIS_MarketStructure para TradingView etiqueta cada quiebre estructural en el momento en que ocurre, te dice si continuó la tendencia o la dio vuelta, y después mapea la zona de retroceso donde vale la pena sumarse a esa tendencia.
Cómo funciona
Cada swing alto y cada swing bajo confirmado se marca con un punto y queda en una lista como punto estructural vivo. Cuando el precio atraviesa uno de ellos, el indicador no se limita a anotar el quiebre: determina de qué tipo fue. Para eso mira el último pivote contrario anterior al que se rompió. Si ese pivote sigue intacto, el movimiento continúa lo que ya venía y el quiebre se etiqueta BOS. Si ese pivote ya había sido quebrado, el mercado está haciendo algo nuevo y la etiqueta es CHoCH.
Esa distinción es la razón entera por la que uno lee estructura. Un quiebre en la dirección que ya venías operando es confirmación; uno en contra es el primer aviso. La etiqueta se dibuja sobre el pivote que cedió, así ves exactamente qué nivel se rompió, y vos elegís si un quiebre exige cierre más allá del nivel o si alcanza con que la mecha lo atraviese.
A partir del último quiebre el indicador arma el rango actual: el pivote roto en un extremo y el último pivote contrario intacto en el otro. Divide ese rango por la mitad y sombrea la parte superior como premium y la inferior como discount, y después traza las dos líneas que delimitan la zona de entrada óptima adentro. En tendencia alcista esa zona cae en la mitad discount, en bajista en la mitad premium, así que siempre queda donde uno querría estar sumándose en lugar de persiguiendo.
El indicador además publica dos salidas de filtro. Se encienden mientras la estructura es alcista y el precio está dentro de la zona de entrada, o bajista y adentro, y permanecen encendidas mientras las dos cosas sigan siendo ciertas. Son un estado y no un disparo de una barra, y eso es lo que las hace útiles como capa de permiso debajo del setup con el que realmente entrás.
Características principales
▸ Cada quiebre estructural etiquetado automáticamente, sobre el pivote que efectivamente cedió
▸ BOS y CHoCH distinguidos por el estado del pivote contrario previo, no a ojo
▸ Confirmación del quiebre por cierre o por mecha, a tu elección
▸ Fuerza de pivote asimétrica: estricta a la izquierda por calidad, corta a la derecha por velocidad
▸ Mitades premium y discount sombreadas desde el rango vivo, redibujadas a medida que la estructura se mueve
▸ Zona de entrada óptima trazada dentro del rango, sobre la mitad que corresponde a la dirección actual
▸ Los dos límites de la zona son configurables, así se puede ensanchar o ajustar a gusto
▸ Filtros de permiso largo y corto, y el estado de tendencia, publicados como salidas para otros scripts
▸ Alertas cuando cualquiera de los dos lados se habilita por primera vez
Parámetros
| Parámetro | Descripción |
|---|---|
| Strength Left | Barras previas al pivote que tiene que superar. Valores más altos conservan solo la estructura más significativa. |
| Strength Right | Barras posteriores necesarias para confirmarlo. Es lo que tarda un pivote en aparecer, así que un valor corto mantiene la lectura al día. |
| Break Confirmation Type | Close exige que la barra cierre más allá del pivote. Wick cuenta con que el extremo lo atraviese, lo que reacciona antes y quiebra más seguido. |
| Signal Offset (Ticks) | Distancia entre el pivote quebrado y su etiqueta. |
| Font Size | Tamaño de las etiquetas BOS y CHoCH. |
| Draw Premium/Discount Zone | Muestra el rango sombreado y las líneas de la zona de entrada. Desactivarlo no afecta a las etiquetas ni a las salidas, solo oculta el dibujo. |
| OTE Level 1 (%) / OTE Level 2 (%) | Los dos límites de la zona de entrada, como porcentajes del rango. El orden no importa: el menor siempre es el borde cercano y el mayor el lejano. |
¿Para quién es?
Para el trader que lee estructura a mano y quiere la misma lectura producida de la misma forma en cada sesión, con las clasificaciones BOS y CHoCH hechas por una regla y no en retrospectiva. Está pensado para ir debajo de un método de entrada y no para reemplazarlo: las etiquetas te dicen qué hizo el mercado, el rango sombreado te dice si el precio está caro o barato dentro de él, y las dos salidas de filtro le dicen a lo que operes después si tiene permiso para disparar.
Listo para automatizar. TIS_MarketStructure es totalmente compatible con nuestro sistema TIS_Automator: usás las salidas de permiso largo y corto, o la salida única de tendencia, para condicionar un setup automatizado de modo que solo opere a favor de la estructura y solo desde la mitad correcta del rango.
TIS_MarketStructure for TradingView labels every structural break as it happens, tells you whether it continued the trend or reversed it, and then maps the retracement zone where that trend is worth joining.
How It Works
Every confirmed swing high and swing low is marked with a dot and then kept on a list as a live structural point. When price trades through one of them, the indicator does not just note the break: it works out what kind of break it was. To do that it looks back at the last opposite pivot before the one that broke. If that pivot is still intact, the move is continuing what was already there and the break is labelled BOS. If that pivot had already been taken out, the market is doing something new and the break is labelled CHoCH.
That distinction is the whole reason to read structure in the first place. A break in the direction you were already trading is confirmation; a break against it is the first warning. The label is drawn on the pivot that was broken, so you can see exactly which level gave way, and you choose whether a break needs a close beyond the level or whether a wick through it counts.
From the most recent break the indicator builds the current range: the broken pivot at one end, the last intact opposite pivot at the other. It splits that range in half and shades the upper part as premium and the lower part as discount, then draws the two lines that bound the optimal entry zone inside it. In an uptrend that zone sits in the discount half, in a downtrend it sits in the premium half, so it always lands where you would want to be joining rather than chasing.
The indicator also publishes two filter outputs. They turn on while the structure is bullish and price is inside the entry zone, or bearish and inside it, and stay on for as long as both remain true. They are a state, not a one bar trigger, which makes them useful as a permission layer under whatever setup you actually enter on.
Key Features
▸ Every structural break labelled automatically, on the pivot that actually gave way
▸ BOS and CHoCH told apart by the state of the preceding opposite pivot, not by guesswork
▸ Break confirmation by close or by wick, your choice
▸ Asymmetric pivot strength: strict on the left for quality, short on the right for speed
▸ Premium and discount halves shaded from the live range, redrawn as the structure moves
▸ Optimal entry zone drawn inside the range, on the correct half for the current direction
▸ Both zone boundaries configurable, so the zone can be widened or tightened to taste
▸ Long and short permission filters and the trend state published as outputs for other scripts
▸ Alerts when either side first becomes enabled
Parameters
| Parameter | Description |
|---|---|
| Strength Left | Bars before the pivot it has to clear. Higher values keep only the more significant structure. |
| Strength Right | Bars after the pivot needed to confirm it. This is how long a pivot takes to appear, so a short value keeps the reading current. |
| Break Confirmation Type | Close requires the bar to close beyond the pivot. Wick counts the extreme trading through it, which reacts sooner and breaks more often. |
| Signal Offset (Ticks) | Distance between the broken pivot and its label. |
| Font Size | Size of the BOS and CHoCH labels. |
| Draw Premium/Discount Zone | Shows the shaded range and the entry zone lines. Turning it off keeps the labels and the outputs working, it only hides the drawing. |
| OTE Level 1 (%) / OTE Level 2 (%) | The two boundaries of the entry zone, as percentages of the range. Order does not matter: the smaller one is always the near edge and the larger one the far edge. |
Who Is It For?
Traders who read structure by hand and want the same read produced the same way every session, with the BOS and CHoCH calls made by a rule rather than in hindsight. It is built to sit underneath an entry method rather than to replace one: the labels tell you what the market did, the shaded range tells you whether price is expensive or cheap within it, and the two filter outputs tell whatever you trade next whether it has permission to fire.
Automation ready. TIS_MarketStructure is fully compatible with our TIS_Automator system: use the long and short permission outputs, or the single trend output, to gate an automated setup so it only trades with the structure and only from the right half of the range.
Solo los clientes que hayan comprado este producto pueden dejar una opinión.
Productos relacionados
-
-
-
Popular
-


Opiniones
Aún no hay opiniones.